Entering Your First Mileage
If you want to use the Auto Routing you will need to turn it on. See
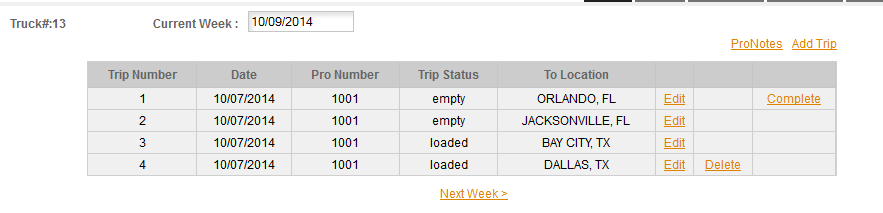
MY ACCOUNT/USER PREFERENCES/PROGRAM FUNCTIONS for details on turning on the Auto Routing feature. We recommend using this functionality to simplify your mileage tracking, but if you are required by the company to record state line crossings and turn them in with a trip sheet you may prefer to do them manually. The program will allow you to do it either way. We'll cover the Auto Routing first and then the Manual Entry process. If you have the Auto Routing turned on, the Trip Sheet page will have an additional column with a COMPLETE link in it. To use this function simply click the COMPLETE link when you arrive at the destination for that leg of the trip.
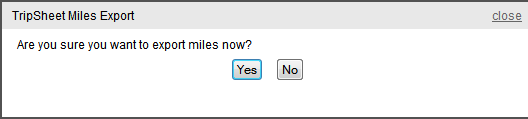
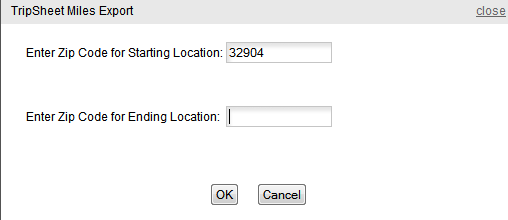
The first popup will ask you to verify that you want to export the miles now - Click YES -
This verification will occur each time you click COMPLETE. Next you'll be asked for the starting & ending zip codes. If you have the zip codes enter them, if you don't leave them blank.
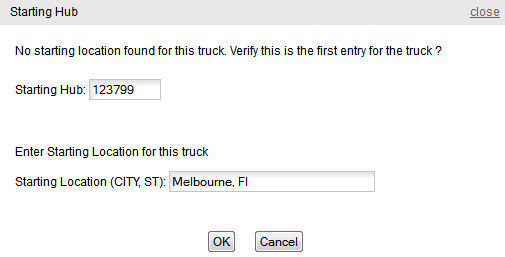
Next the program will prompt you for the Starting Location for the truck. This is the location where you will start driving the truck which may or may not be the first location that you entered in the Trips section. This box will only appear once. After the original starting location is set the program will ALWAYS USE THE LAST LOCATION AS THE START FOR THE NEXT TRIP. You must maintain a non-stop record of all miles traveled, so the program will enforce that. IF YOU SLIP SEAT - if you are not in the same truck every day you can use truck SLIP or any other number of your choice and let the program calculate your miles so you'll have Cost/Mile & Revenue/Mile reports. The mileages in this case will not reflect the actual truck odometer as that will constantly be changing but it will keep track of your miles for your reports and information.
Next the program will prompt you for the Starting Hub (odometer) and the Location for the truck. This is the location where you will start driving the truck which may or may not be the first location that you entered in the Trips section.
Again this box will only appear once. Future trips will always use the last ending odometer as the new starting odometer. Next you'll be asked for the Starting & Ending zip codes again. Mileage accuracy will be improved if you use zip codes, but they are optional. If you have the zip code use it, if you don't leave it blank. If the zip code was provided for the previous destination it will be brought forward automatically as the start of the next trip. The zip code box will appear for each mileage export.
When you click Save on the zip code box the program will run the route and then the Export validation box will appear. ALWAYS CHECK THIS when it appears. If there is something wrong with this route or it ran a different way than you went NOW is the time to find out and change it. Assuming that the mileage is close to correct and the states/routing looks about right click OK to export the miles. If it doesn't look right click CANCEL and you can then go to the Routing page and export the route manual.
REMEMBER - the Automated Mileage is not going to match your odometer. We have a process which you can use to even the miles up between the odometer and the program. Apportion, which is run Quarterly will apportion any difference between the truck odometer and the book miles over all the trips run during the quarter. See
Program Flow Fleet/Miles/Apportion for details on how this works.
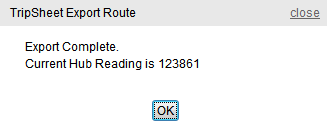
Once you click OK on the mileage export the program will put the miles on the Trip Sheet for you and you will get the Export Complete notice -
The miles for this trip, Melbourne, Fl to Orlando, Fl are now in the mileage section. Click the Miles tab to view this trip -
If you are using the Auto Routing you can skip the manual entry process and
Miles for the next step in entering additional mileages.
MANUAL ENTRY - If you prefer to use the manual entry process this is covered in detail in the Tutor for the Trip Sheet. We'll cover the highlights here but be sure to also watch that tutor (HELP/ACCOUNTING/TRIP SHEET/MILES). Before you start be sure that the Auto Routing is turned off. See
MY ACCOUNT/USER PREFERENCES/PROGRAM FUNCTIONS for details on turning the Auto Mileage on/off. While you can enter Mileages in the Trip Sheet of the Mileage page we strongly recommend using the Trip Sheet as the entry format is much simpler there. This section will cover entering the mileages in the Trip Sheet.
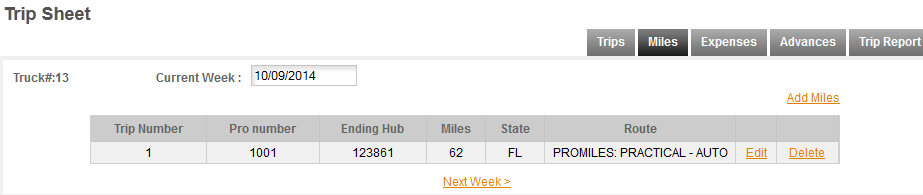
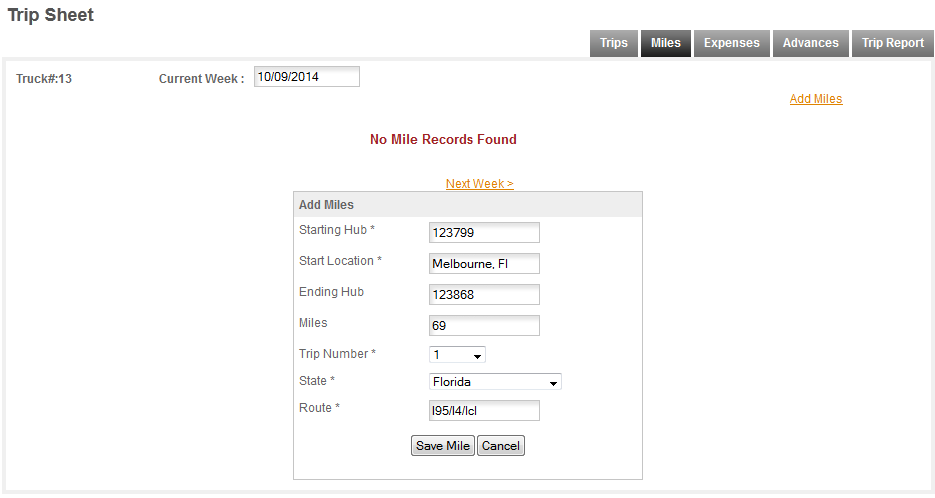
Click MILES to go to the Miles section. It will say NO MILEAGE RECORDS FOUND Click on ADD MILES to display the Add Miles box.
To save time & space we've already completed the Add Miles box. The boxes are explained below.
Starting Hub: This is the odometer before you drive the truck to the first stop entered on the Trip Sheet.
Start Location: This is where you start driving from. In our example Melbourne, Fl In the future the start will always be the last end.
Ending Hub/Miles: You can enter the ending hub (odometer) or the miles. The program will calculate the other for you.
Trip Number: Select the trip number for these miles from the drop down list.
State: Enter the state this miles were run in.
That's all there is to entering your first trip. For help with entering the rest of your mileages see the Miles section.