The Import function needs to be used whether you have the payroll set to Let Me Select Pro or if you have it set to Pay When Delivered. The difference is that with Let Me Select Pro you will need to manually load the Mileage Pay section first and then use the Import button to import any deductions from the Payroll Setup section and any advances, charge backs, etc. from the Income & Expense section.
Truckers Helper is a real time program - that means you enter a Driver Advance in the I&E section when you give the driver the advance and then payroll will automatically import that advance to settle it on the next payroll that is run. The same philosophy applies to Mileage pay, for both payment options, the Let Me Select Selection Box is populated with loads that have been delivered and not yet paid and the Pay When Delivered will import any loads that are delivered but not yet paid. The delivered status is determined from the Dispatch section. So in order for payroll to work correctly you will need to be using the dispatch section to tell the program when loads are actually picked up and when they are delivered.
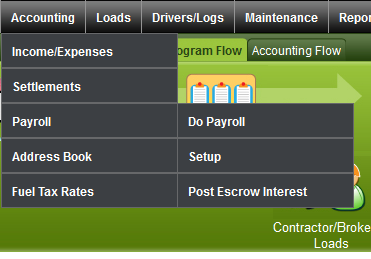
So let's import a payroll. For our example payroll we will do an Owner/Operator, setup in Payroll Setup to pay a percentage and Auto Pay When Delivered is checked. Normally when you Import you will select New Week to start a new week and the Mileage Pay, Other Pay & Deductions sections will be empty. The Reimbursed Expense will always be populated with any outstanding reimbursements for the selected driver. So to get started click ACCOUNTING/PAYROLL/DO PAYROLL from the menu bar -
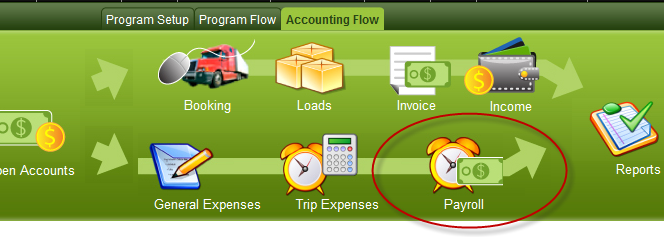
or click on the ACCOUNTING FLOW and then click the Payroll Icon -
You'll then get the SELECT DRIVER box which will list all drivers & owner/operators that are set up in the Payroll Setup.
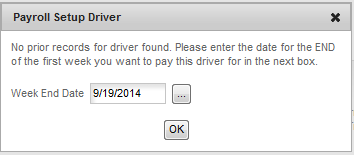
If the driver or o/o you are looking for doesn't appear in the drop down he is not setup in Payroll Setup yet. You'll need to set the driver up in Payroll Setup for he/she to appear in the drop down list. Next you'll get the Date box. For the first payroll this will be the Payroll Setup box -
and you'll enter the date the week ended for the First payroll you want to enter. PAYROLL MUST BE DONE IN ORDER - so if you have a current week but want to start payroll from an earlier time you need to start with that earlier date, enter & export the earlier payrolls and then you can move to the current week. Once you have started entering payrolls the program will always open with the last week that was run for the selected driver. You will use the
NEW WEEK function to start a new week.
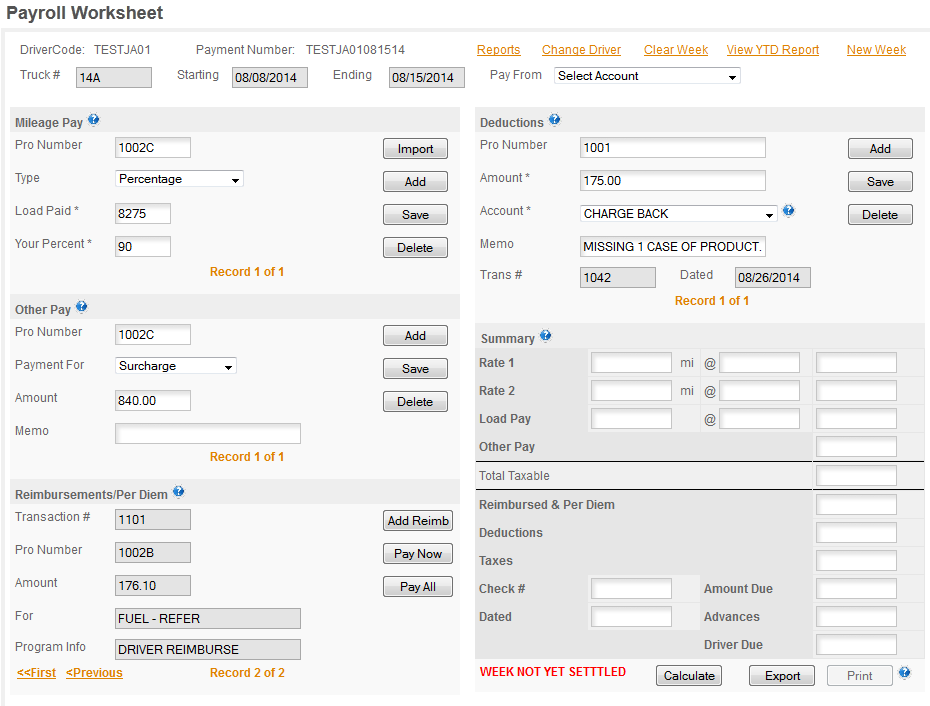
Once you select the week you want the program will open the payroll screen. The screen for the first payroll and for any NEW WEEK will always stat out with the Mileage Pay, Other Pay & Deductions sections blank. The Reimbursed Expenses will always populate with any outstanding reimbursements for the selected driver -
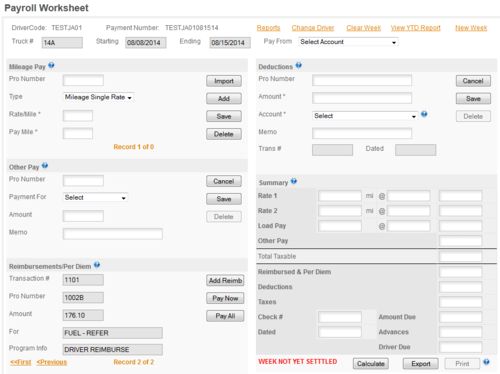
What you do next depends on how the person is set up in Payroll Setup. If the driver is setup for Let Me Select Pro you will click the ADD button in the Mileage Pay section and select the Pro Number(s) to pay from the popup list that will appear. If you DO NOT HAVE ANY LOADS TO PAY you will skip that step and go straight to IMPORT. It is possible to run payroll for weeks where the driver does not have any pay but does have deductions that need to be taken. In that case the payroll will pay the week using
NEGATIVE PAYROLL. If the driver is set, as it is in this case for our sample payroll to Auto Pay When Delivered, then you will click IMPORT as the first step in running the payroll. The next box to appear will then be the Driver Advances popup -
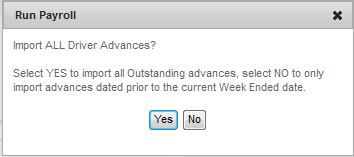
Click YES to have the program import ALL OUTSTANDING ADVANCES or click NO and the program will only export advances given prior to the Week Ended date for this payroll. Charge Backs - which we have outstanding for our sample driver will always load regardless of which option you select. The program will then display the Payroll Screen with the payroll imported for you.
The payroll has imported 1002C, this includes all payroll shown in 1002A, 1002B & 1002C. For SubPros the program does not attempt to separate the individual sections into proportional part but instead shows all the expenses under the last SubPro. You can now review the Reimbursements and either PAY ALL to have the program pay all of them or use the PAY NOW to pay the individual ones you want to pay at this time.
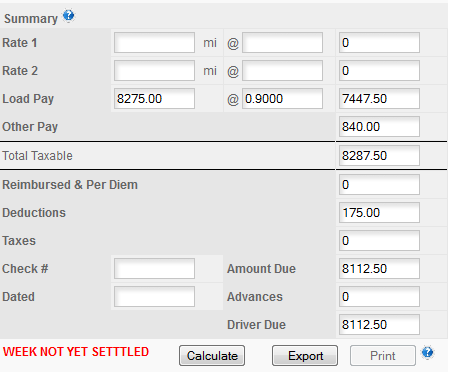
Next we recommend, especially in the beginning, that you click CALCULATE and review the numbers to be sure they look correct.
Note that this need is not yet 'SETTLED' and the Print button is grayed out. In order to finish this week you need to EXPORT the week. When you click Export the program will export this payroll to the Income & Expense section and you will then be able to Print the Settlement Report.
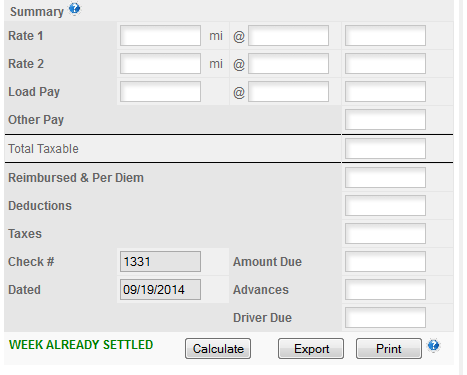
The week is now 'SETTLED' and the Print button for the Settlement Report is active. This week is exported to Income & Expenses and is finished.